March 3, 2026
How to paint a snowy landscape in watercolor without white paint
To paint a snowy landscape in watercolor, I let the white of the paper be the snow and I paint what surrounds it: the sky, the background, the shadows. I use 8 techniques, grouped into 3 parts working from the top of the landscape down: snowy peaks, the life in the middle (vegetation, cabins, fir trees) and the white carpet effect on the ground. Each one takes just a few minutes, with no masking fluid and no white gouache.
Why avoid white watercolor on snow?
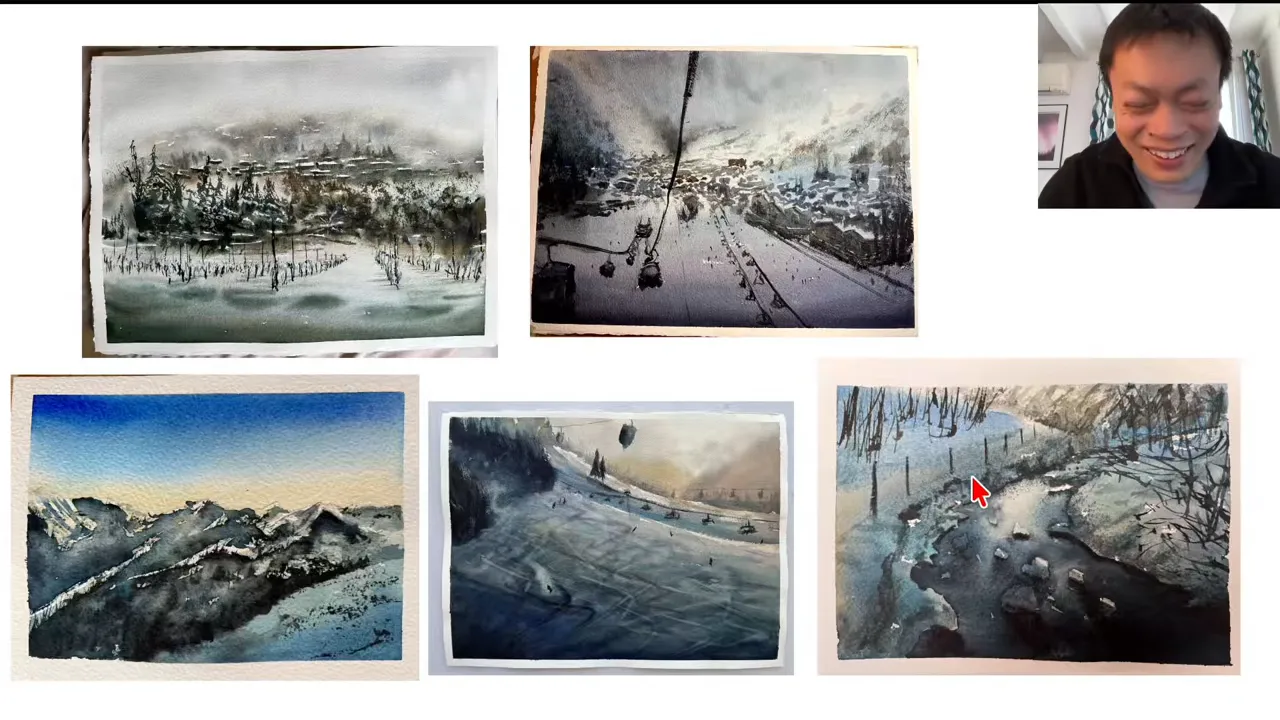
For a long time, I spent hours on my snowy watercolors. I kept adding more and more white watercolor. That's not wrong in itself, but you tend to lose transparency when you add too much. And above all, my snowy watercolors were incredibly dark. I held a belief that worked against me for years: I thought that to get light on the snow, I couldn't just leave the white of the paper. The techniques below are the result of more than 12 years of practice and struggle with snowy landscapes.
How to paint snowy mountains in watercolor
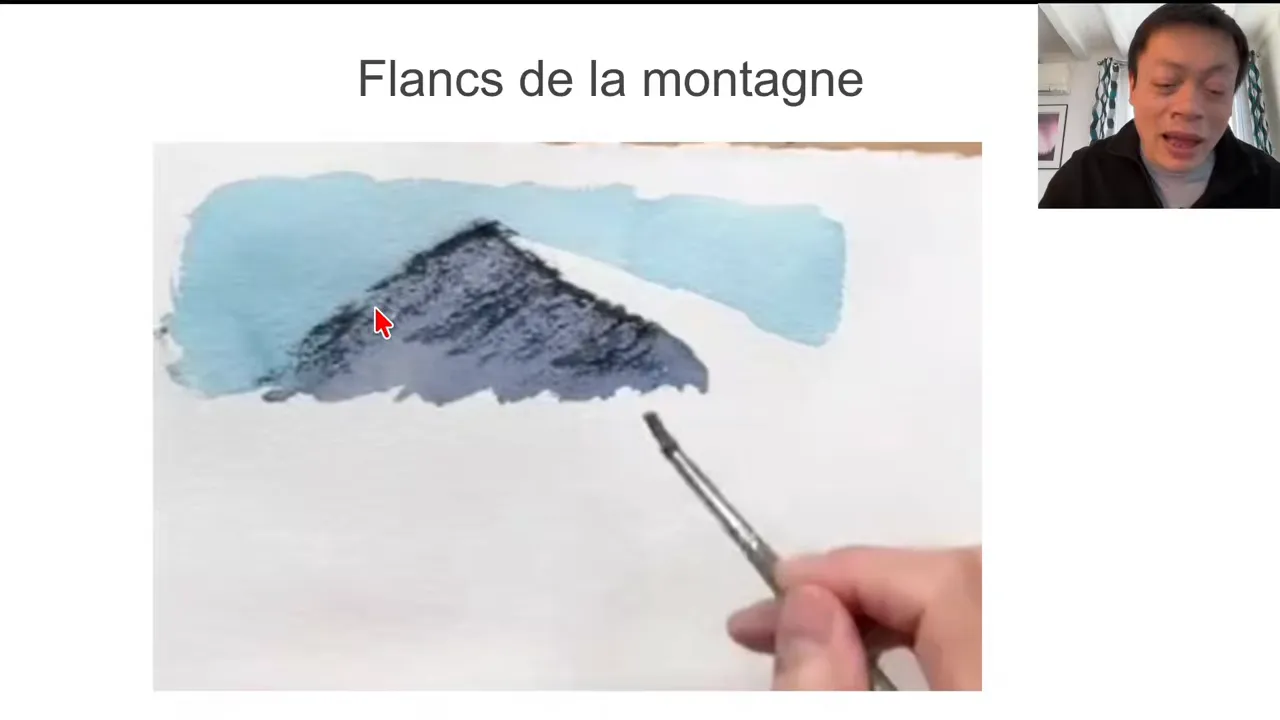
A snowy mountain often has a lit side and a shaded side. If it's entirely in shadow, you only apply the technique to the shaded part. And when you have several mountains in a row, one casts its shadow onto the next.
Technique 1: the slalom technique
I used to forbid myself from using the white of the paper, so I had to handle soft transitions between light and shadow: one mountain watercolor took me more than an hour. With the slalom, I painted another one in a few seconds. The technique has 4 steps, and the last one is optional:
- Take a brush, ideally a mop brush, fairly dry and loaded with pigment, and slalom right, then left, down the lit slope. This creates the relief on the lit side.
- Work along the ridge line with more water, slaloming the same way, to fill in the shaded side. The mistake to avoid is coming straight down the mountain in one go. Keep slaloming, and the relief appears naturally.
- Paint the sky with a different blue from the mountain's and cap the mountain with that sky. It comes to life in a few seconds.
- Once it's dry, go back in with a synthetic brush that holds very little water, with lots of pigment, slaloming again. This creates a rocky texture in the dark area.
Technique 2: the point technique
This one is for painting a convincing cast shadow from one mountain onto another, lit mountain. If you look closely, these shadows often end in points, because there's so much relief: they're rarely a straight line. Move your brush very lightly, a bit like a dance step, controlled but light in the result, to create these points. Before I understood this, I did anything and everything in that area, and when it worked, it was pure luck. Once you've mastered it, you can combine it with the slalom to add texture to the dark areas.
How to bring the middle of a snowy landscape to life
Many snowy landscapes have no mountain in the distance. Look at your landscape and identify which case it is: vegetation, snowy houses and cabins, or snowy fir trees.
Technique 3: soft focus, for vegetation
The idea is to use the background to frame the snow, which is mostly the white of the paper. The trees are painted wet-in-wet, in a few seconds:
- Lay down a first wash that gradually darkens toward the horizon.
- Add more pigment to define some of the trees more clearly.
- With a dagger brush, paint the tiny bumps in the snow: lines of bushes, footprints.
Technique 4: the cotton effect, for cabins and houses
- Lay a very pale color in the lightest areas of snow, for example the top of the cabin.
- The further down you go, the darker you make it, letting the colors blend. The goal isn't a pale band and a dark band, but a transition that gives the snow its silky look. Let it dry completely.
- Go back in underneath, darker, to define the edge of the snow.
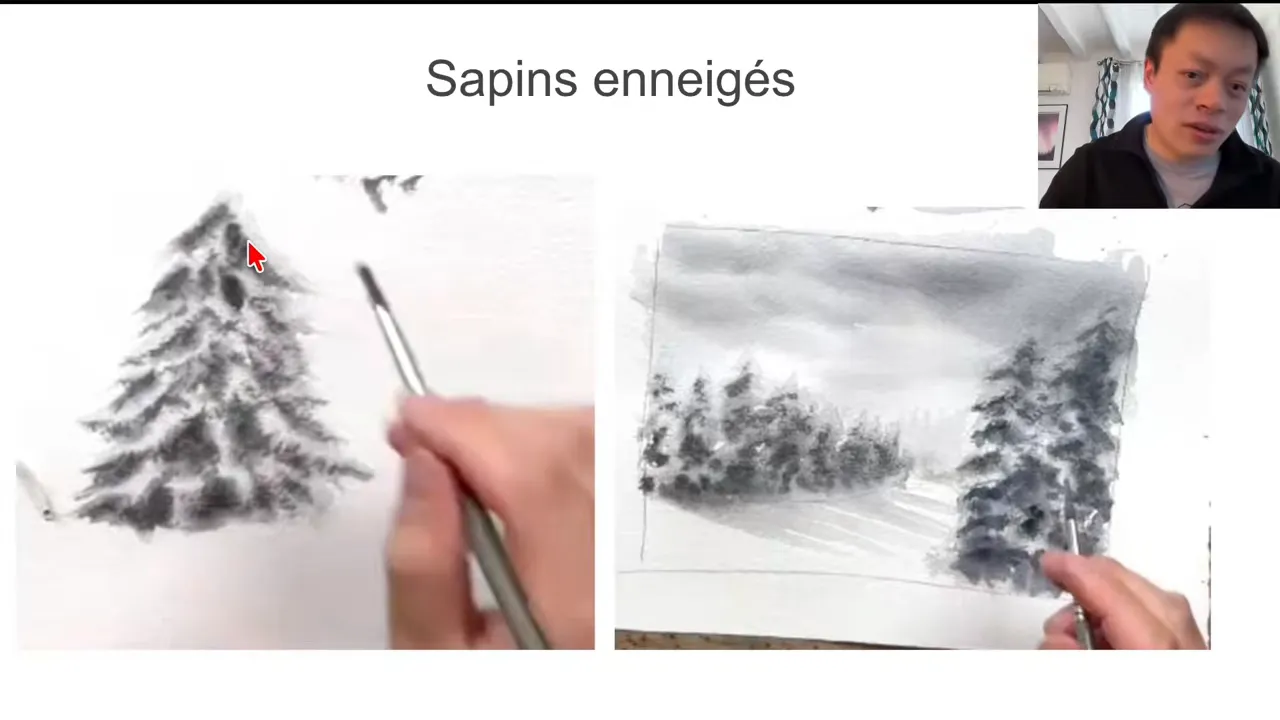
Technique 5: the invaders technique, for fir trees
I used to end up with "white sausages" and I'd add white watercolor. This technique let me paint a fir tree without any white watercolor at all:
- Define the outline of the tree with a light color. Not necessarily clear water, but a color that stays fairly pale.
- Inside, drop in pigment while the layer is still wet. This creates tiny variations and soft areas. Let it dry completely.
- With a brush holding very little water, scrub dry on dry to define the white of the snow. This is the invasion: the very dry pigment invades the white, and the branches of the fir tree push into the snow.
Step 2 gives soft effects, and step 3 gives more defined ones.
How to suggest a white carpet of snow on the ground
Technique 6: the 3 caresses, for a wide expanse of snow
- Unlike my usual habit of working on dry paper, wet the whole snow area. Not a puddle: you want a medium level of moisture, where the water doesn't run everywhere.
- With a mop brush moderately loaded with water and pigment, limit yourself to 3 caresses, starting with a horizontal one. The pigment shouldn't spread in every direction, nor stay too much in place: it should spread slowly and gently.
- If needed, adjust: go back over the "cat hairs" shooting off in every direction to erase them.
Why 3 caresses? To avoid overworking. Snow is a delicate texture, and you need to handle it delicately.
Technique 7: the reverse technique, for a river in the snow
In green countryside, the river is usually lighter because it reflects the sky. In a snowy landscape, it's the opposite. Instead of painting the land, you leave it white and paint only the river:
- With a moderate amount of pigment, paint only the river.
- While it's still wet, add pigment on the left and right to suggest reflections.
- Drop pure pigment along the banks, on both sides: it's so concentrated that it suggests little pebbles. This anchors the snow to the water.
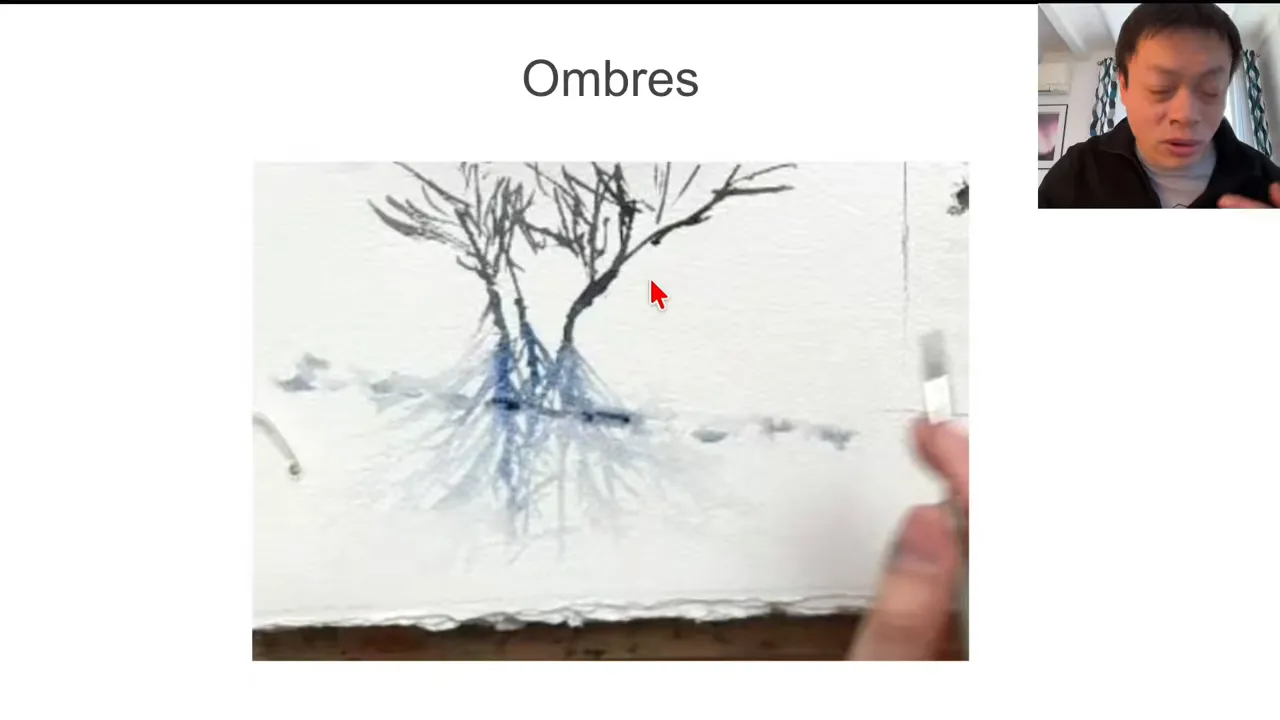
Technique 8: dispersion, for shadows on snow
Just like a ray of light passing through a prism and splitting into lots of smaller rays, shadows disperse. 2 steps are enough:
- With a dark pigment, paint the shadows at the base of your object, often trees, which are perfect for describing the relief.
- With a brush free of pigment, only water, spread this dark area out following the foliage and branches.
Here, I keep the paper dry and disperse the pigment into areas I've defined with clear water. You get lots of variation in the shadows while keeping the painting easy to read, and you can add a little path with footprints.
FAQ
Do you need masking fluid to paint snow in watercolor?
No. All 8 techniques work with no masking fluid and no white gouache: the snow is the white of the paper, brought out by what you paint around it.
Should the river be lighter than the snow?
No. In a snowy landscape, the river is darker than the land: you leave the land white and paint only the water.
Which technique helps if you tend to overwork your watercolors?
The 3 caresses. It takes a fine balance of pigment and knowing when to stop, which makes it a great exercise for anyone who tends to go back over their work again and again.
If you want to finally create on your own, with a proven system instead of copying tutorials, this is exactly what you'll find here 👇
Discover The Loose Watercolor System