October 17, 2025
How to paint waves in watercolor
To paint a wave in watercolor, I start by working out what moment it's in: before, during or after it breaks. Each moment calls for a different approach. Then I paint the foam wet-in-wet, saving the white of the paper. I bring the wave out by painting in negative around it (the sky, the background, the sea), and I finish with the wet sand, which reflects the sky and the foam.
How do you tell what type of wave you're painting?
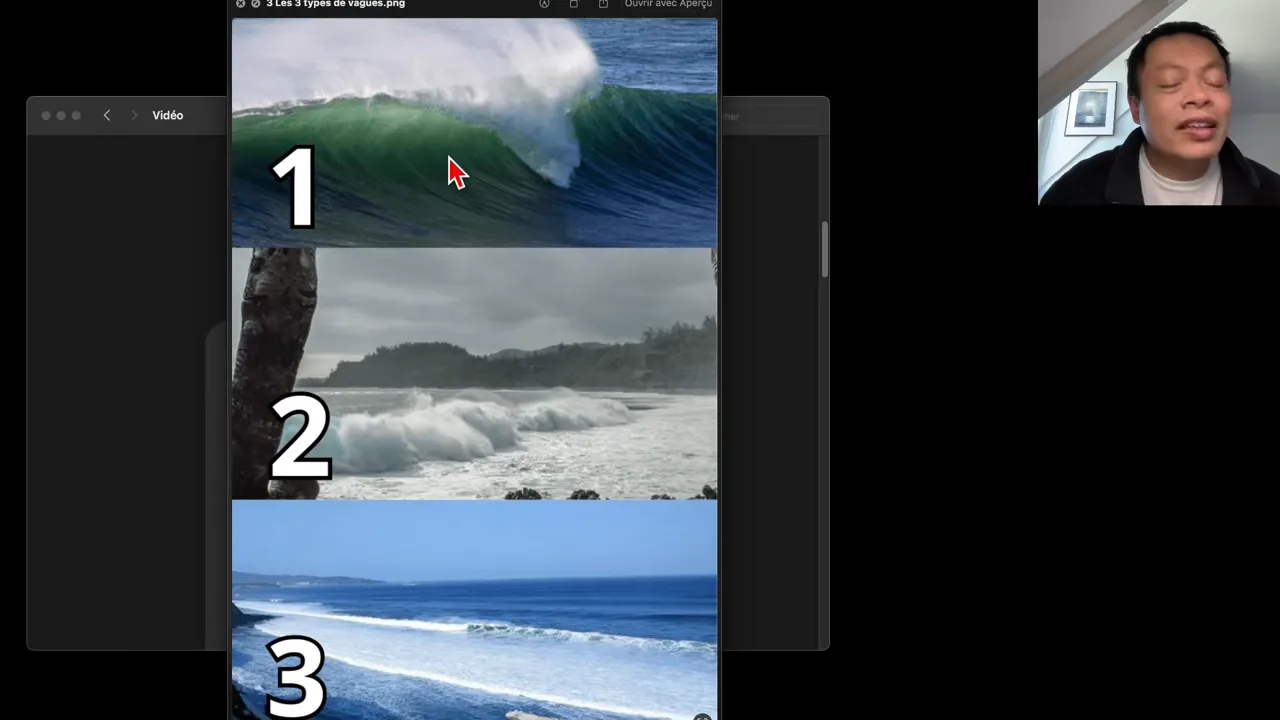
There are so many kinds of waves that you could never list them all. On surfing websites, I found terms like spilling, plunging, surging and semi-surging, and I ended up completely overwhelmed. I'm not a surfer. I'd rather look at waves as a timeline, like past, present and future. It's a simplification of something far more nuanced. But it lets you put the wave in a category and apply the pack of techniques that goes with it.
- Before the wave breaks: it has color, greens and blues, and you can see its texture. You'll use more colors.
- While it breaks: there's much less green or blue. The foam takes over, and the volume is thicker. You rely more on the white of the paper.
- After it breaks: the foam spreads across the whole depth, and it's much flatter. You get a white surface, even though in reality it's never completely white. Here again you use the white of the paper, but over a thinner band.
My reference photo showed a beach in Brittany with fairly cool colors. I told myself: this is a "during" wave. That guided everything I did.
What are the steps to paint a breaking wave?
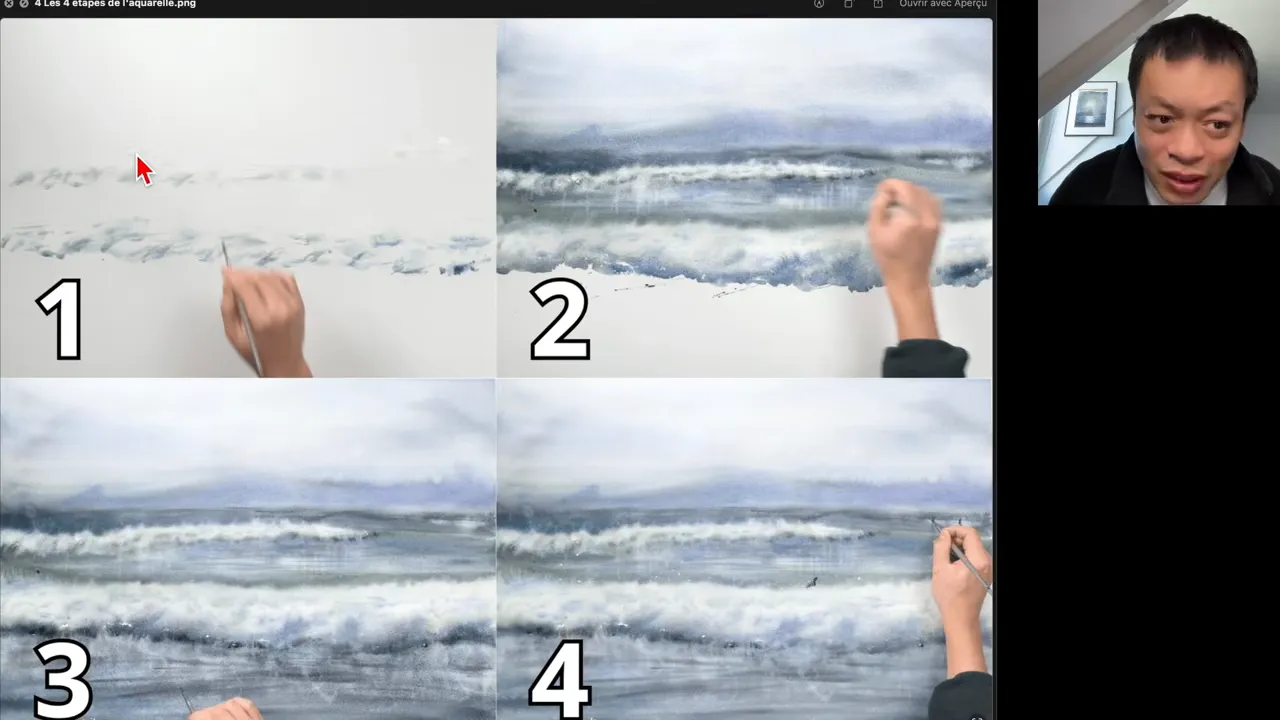
You don't need drawing skills. I just pencilled in the boundaries: the top of the wave, the bottom, and the spot where another wave was forming. I kept the cool colors of the reference, and the painting took me about 1 hour.
- The light parts of the foam. I wet the whole area, then painted all the tiny shifts in tone you see in the foam of a wave as it breaks.
- Negative painting. I painted dark around the wave to bring out its shape: the sky, the mountains in the background, and the sea, which has a different texture. I was stressed, because I was working wet: everything is blurry and the pigment can spread in every direction.
- The wet sand. Sand covered in water isn't brown. It picks up the color of the sky, of the wave and of the sea's texture. So here, it's a cool surface. This area was starting to dry, and when a watercolor dries too much, you can easily end up with blooms. But it turned out fine.
- The details. I added the surfers, one of whom my family mistook for a bird. Once the painting was dry, I added a few drops of white watercolor to suggest spray. Some details feel pointless to me, but this one makes the whole scene feel much wetter: you can sense the wave crashing.
What are the 3 most common problems when painting waves?
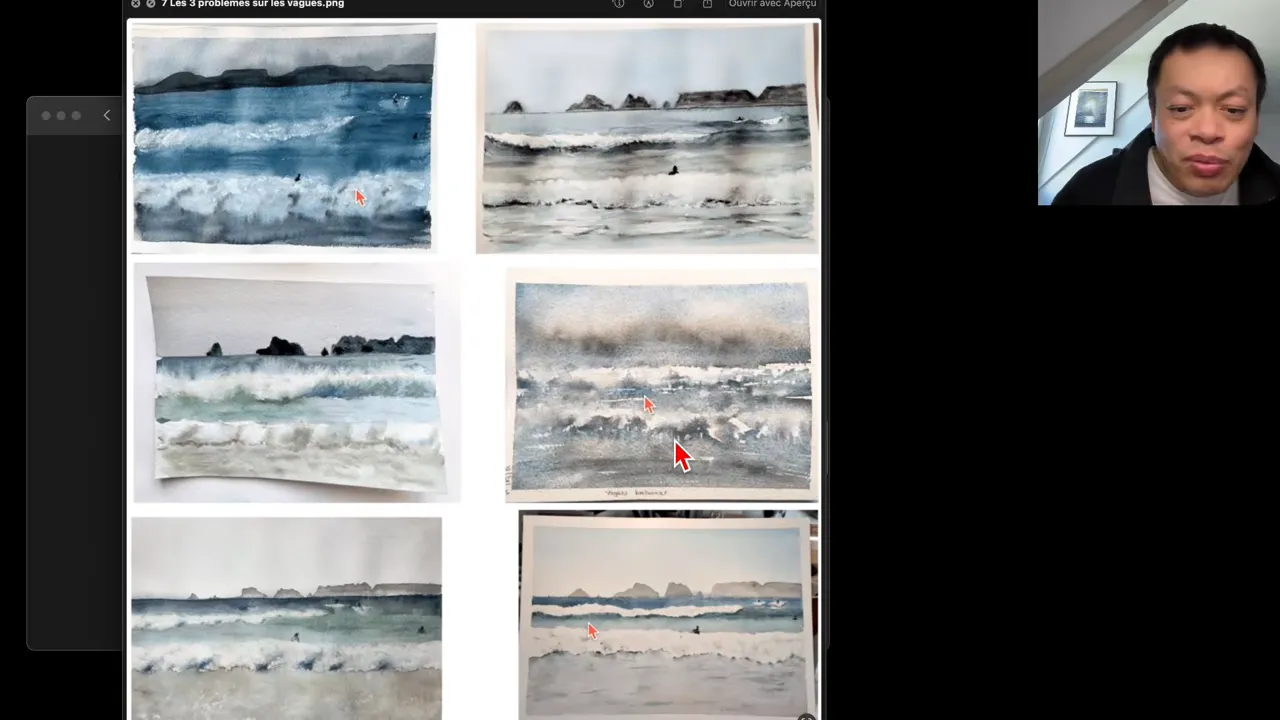
If you've already painted waves, look at them again through these 3 criteria.
- The foam. If you lose the white of the paper in the foam, you end up short on both light and texture.
- How readable the wave is. Feathery bleeds or blooms make the wave harder to read. You can also lose readability when you can no longer tell the sea, the wave itself, the sand and the sky apart.
- The wet sand. When the foam reaches the sand, the sand is wet. At the very least, you need to show that reflection of the foam and the sky on the sand.
What exercises help you get better at painting waves?
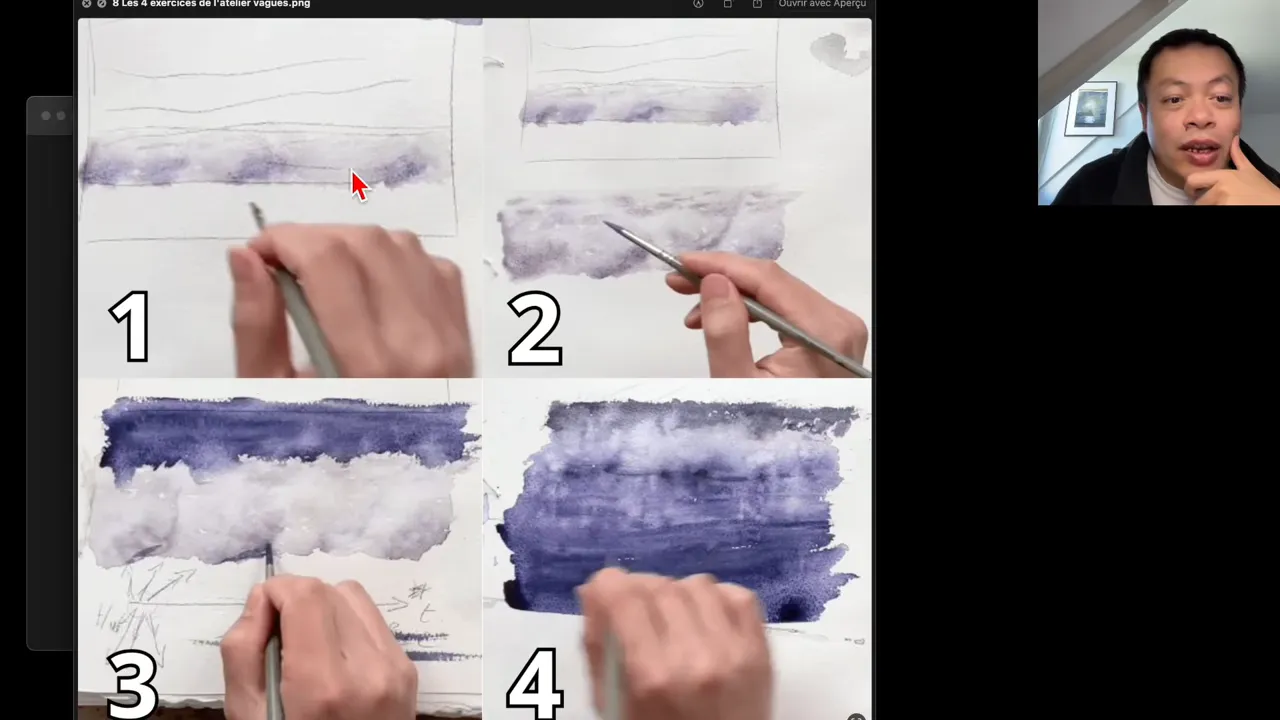
Here are the 4 exercises I gave my students during the workshop.
- Foam on its own. This is already hard enough, because you have to keep the light of the foam, which means the white of the paper. If the wave is too small for you and you can't loosen your stroke, let yourself make the area bigger. Look at the texture too. In the foreground it runs more diagonally; in the distance it becomes more horizontal. That makes all the difference and gives the foam depth.
- Soft negative painting. Once the first exercise was dry, I went back in and surrounded the foam with the sea to suggest a wave. My students told me it reminded them of clouds. An exercise isn't just for one subject: what you do for your waves can be reused for your clouds, and for any cotton-like texture.
- Negative painting with a defined edge. This time, the line between the sea and the wave is crisper, a bit jagged, a bit crumbly. As soon as I painted it, I saw the wave appear.
- Wet sand. This exercise is about capturing the reflection on wet sand. I did it in 30 seconds, and the wave effect was almost better than the one I'd spent 2, 3 or 4 minutes on.
Why does a wave turn out better when you're not chasing the result?
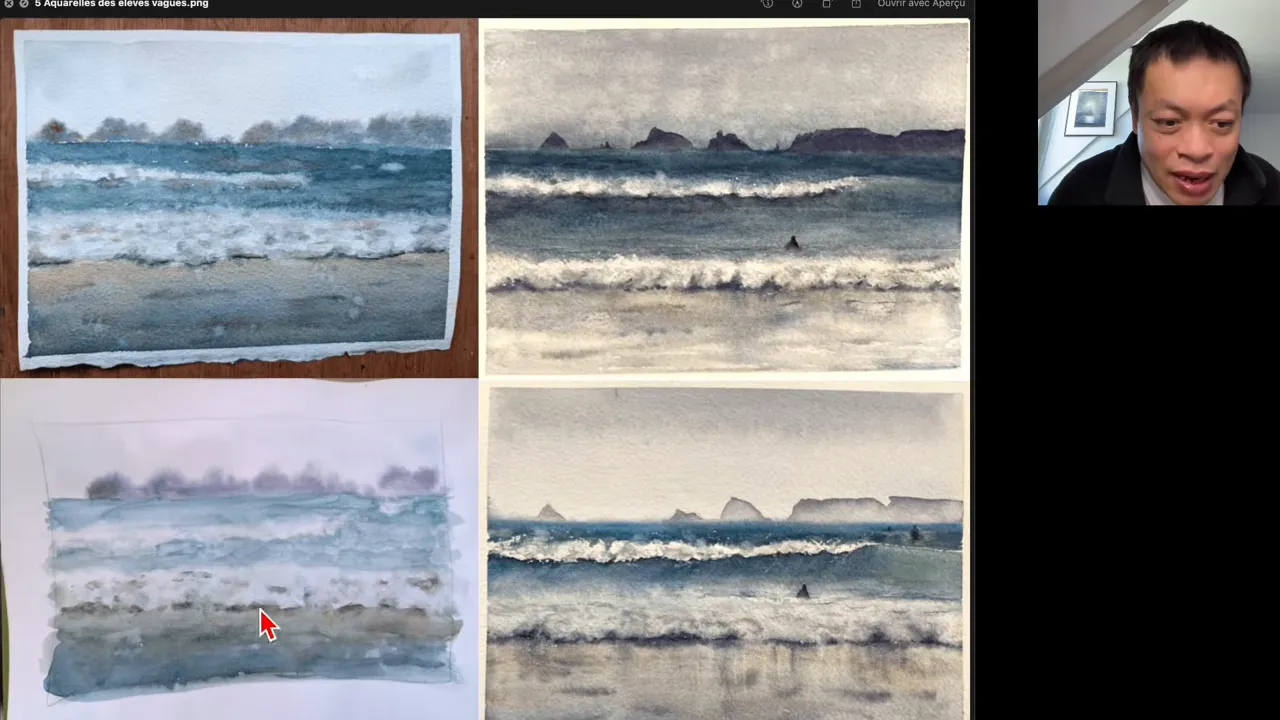
In that last exercise, what I had in mind wasn't the wave, it was the wet sand. Once you're completely detached from how the wave turns out, that's when the most beautiful waves appear.
I saw the same thing with one of my students. She had painted a watercolor on taped, stretched paper, in a high-stakes setting. She had also done a small test on a loose sheet, in a low-stakes setting. I feel much more lightness and spontaneity in the second one. When I paint a full watercolor, I get attached to the result, I tell myself it has to be beautiful, and I put insane pressure on myself. If you feel your stroke tightening up, ask yourself what you're genuinely curious to try, and what might be fun. Otherwise, your stroke will stiffen and you'll spend much longer mixing your colors.
To ease that pressure, you can do your tests on a smaller format. I painted directly on a large 56 x 76 cm sheet. I often linger over details, and a watercolor sometimes takes me more than 2 hours. This one was done in 1 hour. Beforehand, I had painted waves with my students in low-stakes settings, on small formats, having fun together. The more you let go in low-stakes settings, the more you'll manage it when the stakes are high.
Another lesson: 2 attempts will never be the same in watercolor. With the same student, one attempt had really beautiful reflections on the sand. The other blended the waves into the sea better, thanks to more developed negative painting. Every attempt has things to improve and things that are really great.
FAQ
Do you need to know how to draw to paint a wave in watercolor?
No. A few pencil lines marking the edges of the wave are enough, and then everything happens with the brush.
How long does it take to paint a wave in watercolor?
My large wave took me about 1 hour. The workshop exercises take a few minutes each, and the wet sand one just 30 seconds.
Are wave exercises useful for other subjects?
Yes. What you learn painting foam can be reused for clouds or any cotton-like texture, like cotton in a still life.
If you want to finally create on your own, with a proven system instead of copying tutorials, this is exactly what you'll find here 👇
Discover The Loose Watercolor System